Workspace window
What do you want to do?
Learn about project management, see Introduction to managing projects
Learn how to: Managing projects
Get reference information about the Workspace window, see below the line.

The Workspace window is available from the View menu.
Use this window to access your projects and files during the application development.
The display area
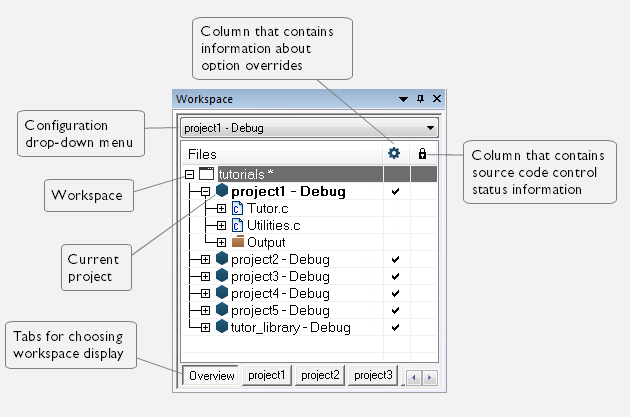
This area contains up to three columns.
The Files column displays the name of the current workspace and a tree representation of the projects, groups and files included in the workspace.
Note
An asterisk (*) after the filename means that changes have been made to the workspace/project or settings since it was last saved.
One or more of these icons are displayed:


The column  that contains status information about option overrides can have one of three icons for each level in the project:
Blank | There are no settings/overrides for this file/group. |
Black check mark | There are local settings/overrides for this file/group. |
Red check mark | There are local settings/overrides for this file/group, but they are either identical to the inherited settings or they are ignored because you use multi-file compilation, which means that the overrides are not needed. |
The column  contains status information about version control, if this is enabled. For information about the various icons, see Subversion states.
Use the tabs at the bottom of the window to choose which project to display. Alternatively, you can choose to display an overview of the entire workspace.
For more information about project management and using the Workspace window, see the Introduction to managing projects.
Context menu
This context menu is available:
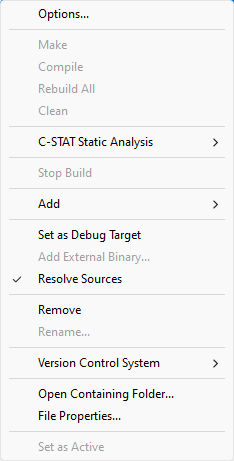
These commands are available:
- Options
Displays a dialog box where you can set options for each build tool for the selected item in the Workspace window, for example to exclude it from the build. You can set options for the entire project, for a group of files, or for an individual file. See Setting project options using the Options dialog box.
- Make
Brings the current target up to date by compiling, assembling, and linking only the files that have changed since the last build.
- Compile
Compiles or assembles the currently active file as appropriate. You can choose the file either by selecting it in the Workspace window, or by selecting the editor window containing the file you want to compile.
- Rebuild All
Recompiles and relinks all files in the selected build configuration.
- Clean
Deletes intermediate files.
- C-STAT Static Analysis>Analyze Project
Makes C-STAT analyze the selected project. For more information about C-STAT, see the C-STAT® Static Analysis Guide.
- C-STAT Static Analysis>Analyze File(s)
Makes C-STAT analyze the selected file(s). For more information about C-STAT, see the C-STAT® Static Analysis Guide.
- C-STAT Static Analysis>Clear Analysis Results
Makes C-STAT clear the analysis information for previously performed analyses. For more information about C-STAT, see the C-STAT® Static Analysis Guide.
- C-STAT Static Analysis>Generate HTML Summary
Shows a standard Save As dialog box where you can select the destination for a report summary in HTML and then create it. For more information about C-STAT, see the C-STAT® Static Analysis Guide.
- C-STAT Static Analysis>Generate Full HTML Report
Shows a standard Save As dialog box where you can select the destination for a full report in HTML and create it. For more information about C-STAT, see the C-STAT® Static Analysis Guide.
- Stop Build
Stops the current build operation.
- Add>Add Files
Displays a dialog box where you can add files to the project.
- Add>Add filename
Adds the indicated file to the project. This command is only available if there is an open file in the editor.
- Add>Add Group
Displays the Add Group dialog box where you can add new groups to the project. For more information about groups, see Groups.
- Set as Debug Target
Starts the debug session with the selected file as the debug target.
- Add External Binary
Opens a standard navigation dialog box, in which you can select an externally built binary file to add to the project.
- Resolve Sources
Tries to locate and display the source files that the selected binary file was built from. If any files cannot be located, the Add Folder Alias dialog box is displayed, see Add Folder Alias dialog box.
- Remove
Removes selected items from the Workspace window.
- Rename
Displays the Rename Group dialog box where you can rename a group. For more information about groups, see Groups.
- Version Control System
Opens a submenu with commands for source code control, see Version Control System menu for Subversion.
- Open Containing Folder
Opens the File Explorer that displays the directory where the selected file resides.
- File Properties
Displays a standard File Properties dialog box for the selected file.
- Set as Active
Sets the selected project in the overview display to be the active project. It is the active project that will be built when the Make command is executed.