Project menu
The Project menu provides commands for working with workspaces, projects, groups, and files, and for specifying options for the build tools, and running the tools on the current project.
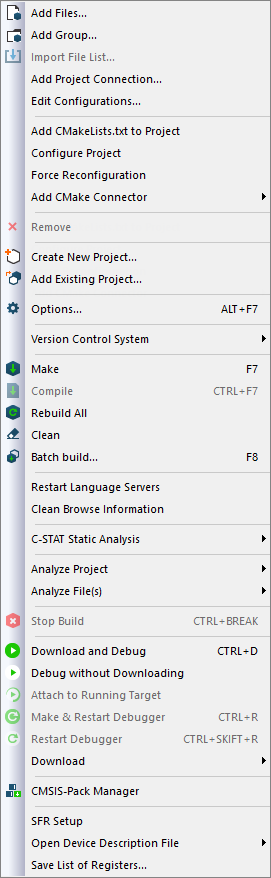
Menu commands
These commands are available:
- Add Files

Displays a dialog box where you can select which files to include in the current project.
- Add Group

Displays a dialog box where you can create a new group. In the Group Name text box, specify the name of the new group. For more information about groups, see Groups.
- Import File List

Displays a standard Open dialog box where you can import information about files and groups from projects created using another IAR toolchain.
To import information from project files which have one of the older filename extensions
peworprjyou must first have exported the information using the context menu command Export File List available in your current IAR Embedded Workbench.
- Add Project Connection
Displays the Add Project Connection dialog box, see Add Project Connection dialog box.
- Edit Configurations
Displays the Configurations for project dialog box, where you can define new or remove existing build configurations. See Configurations for project dialog box.
- Add CMakeLists.txt to Project
Opens a standard Windows Open dialog box, where you can browse for a
CMakeLists.txtfile to add to the Embedded Workbench project. Adding it can take a few minutes.Note
This removes any files that are already part of the project.
- Configure Project
Synchronizes all build files with the CMake project files. This is done automatically when you open a project and when you build.
- Force Reconfiguration
Deletes all build files generated by CMake and reruns CMake to regenerate them.
- Add CMake Connector>CSolution
Opens a standard Windows Open dialog box, where you can browse for a CMSIS-Toolbox
csolution.ymlproject file to add to the Embedded Workbench project. Adding it can take a few minutes.Note
This removes any files that are already part of the project.
- Remove

In the Workspace window, removes the selected item from the workspace.
- Create New Project

Displays the Create New Project dialog box where you can create a new project and add it to the workspace, see Create New Project dialog box.
- Add Existing Project

Displays a standard Open dialog box where you can add an existing project to the workspace.
- Options (Alt+F7)

Displays the Options dialog box, where you can set options for the build tools, for the selected item in the Workspace window, see Options dialog box. You can set options for the entire project, for a group of files, or for an individual file.
- Version Control System
Displays a submenu with commands for version control, see Version Control System menu for Subversion.
- Make (F7)

Brings the current build configuration up to date by compiling, assembling, and linking only the files that have changed since the last build.
- Compile (Ctrl+F7)

Compiles or assembles the currently selected file, files, or group.
One or more files can be selected in the Workspace window—all files in the same project, but not necessarily in the same group. You can also select the editor window containing the file you want to compile. The Compile command is only enabled if all files in the selection can be compiled or assembled.
You can also select a group, in which case the command is applied to each file in the group (also inside nested groups) that can be compiled, even if the group contains files that cannot be compiled, such as header files.
If the selected file is part of a multi-file compilation group, the command will still only affect the selected file.
- Rebuild All

Rebuilds and relinks all files in the current target.
- Clean

Removes any intermediate files.
- Batch Build (F8)

Displays the Batch Build dialog box where you can configure named batch build configurations, and build a named batch. See Batch Build dialog box.
- Restart Language Servers
Stops and restarts any running language servers.
- Clean Browse Information
Deletes the browse information directory along with the information stored in it. For information about specifying the location of this directory, see Output.
- C-STAT Static Analysis>Analyze Project
Makes C-STAT analyze the selected project. For more information about C-STAT, see the C-STAT® Static Analysis Guide.
- C-STAT Static Analysis>Analyze File(s)
Makes C-STAT analyze the selected file(s). For more information about C-STAT, see the C-STAT® Static Analysis Guide.
- C-STAT Static Analysis>Clear Analysis Results
Makes C-STAT clear the analysis information for previously performed analyses. For more information about C-STAT, see the C-STAT® Static Analysis Guide.
- C-STAT Static Analysis>Generate HTML Summary
Shows a standard save dialog box where you can select the destination for a report summary in HTML and create it. For more information about C-STAT, see the C-STAT® Static Analysis Guide.
- C-STAT Static Analysis>Generate Full HTML Report
Shows a standard save dialog box where you can select the destination for a full report in HTML and create it. For more information about C-STAT, see the C-STAT® Static Analysis Guide.
- Analyze Project
Runs the external analyzer that you select and performs an analysis on all source files of your project. The list of analyzers is populated with analyzers you specify on the External Analyzers page in the IDE Options dialog box.
Note that this menu command is only available if you have added an external analyzer. For more information, see Getting started using external analyzers.
- Analyze File(s)
Runs the external analyzer that you select and performs an analysis on a group of files or on an individual file. The list of analyzers is populated with analyzers you specify on the External Analyzers page in the IDE Options dialog box.
Note that this menu command is only available if you have added an external analyzer. For more information, see Getting started using external analyzers.
- Stop Build (Ctrl+Break)

Stops the current build operation.
- Download and Debug (Ctrl+D)

Downloads the application and starts C-SPY so that you can debug the project object file. If necessary, a make will be performed before running C-SPY to ensure the project is up to date. This command is not available during a debug session.
- Debug without Downloading

Starts C-SPY so that you can debug the project object file. This menu command is a shortcut for the Suppress Download option available on the Download page. The Debug without Downloading command is not available during a debug session.
- Attach to Running Target

Makes the debugger attach to a running application at its current location, without resetting the target system. If you have defined any breakpoints in your project, the C-SPY driver will set them during attachment. If the C-SPY driver cannot set them without stopping the target system, the breakpoints will be disabled. The option also suppresses download and the Run to option.
If the option is not available, it is not supported by the combination of C-SPY driver and device you are using.
- Make & Restart Debugger

Stops C-SPY, makes the active build configuration, and starts the debugger again—all in a single command. This command is only available during a debug session.
- Restart Debugger

Stops C-SPY and starts the debugger again—all in a single command. This command is only available during a debug session.
- Download
Commands for flash download and erase. Choose between:
Download active application downloads the active application to the target without launching a full debug session. The result is roughly equivalent to launching a debug session but exiting it again before the execution starts.
Download file opens a standard Open dialog box where you can specify a file to be downloaded to the target system without launching a full debug session.
Erase memory erases all parts of the flash memory.
If your
.boardfile specifies only one flash memory, a simple confirmation dialog box is displayed where you confirm the erasure. However, if your.boardfile specifies two or more flash memories, the Erase Memory dialog box is displayed. For information about this dialog box, see Erase Memory dialog box.
- CMSIS-Manager
Displays the CMSIS Manager dialog box, see CMSIS Manager dialog box.
This menu command is only available if your target supports CMSIS-Pack.
- SFR Setup
Opens the SFR Setup window which displays the currently defined SFRs that C-SPY has information about. For more information about this window, see SFR Setup window.
- Open Device Description File
Opens a submenu where you can choose to open a file from a list of all device files and SFR definitions files that are in use.
- Save List of Registers
Generates a list of all defined registers, including SFRs, with information about the size, location, and access type of each register. If you are in a debug session, the list also includes the current value of the register. This menu command is only available when a project is loaded in the IDE.